Meta Ads for Restaurants: A Step-by-Step Breakdown
Ever spent $50 on the 'Boost Post' button only to get a few extra likes and a sense of regret? While boosting is easy, it’s like handing out flyers on a random street corner, you have no real control. A real ad campaign is different. Instead of random flyers, imagine sending a personal invitation directly to people celebrating a birthday, couples living nearby, or locals interested in 'fine dining.' This precision is the foundation of a smart advertising strategy, ensuring your budget reaches potential diners, not the entire city. This guide provides a step-by-step recipe for turning your social media page into a reliable tool for bringing new customers through your door.
(For more guidance on building strong campaigns, explore our effective restaurant marketing strategies.)
The 3-Part Recipe for Every Successful Meta Ad
Jumping from the 'Boost Post' button into the full Ads Manager can feel like walking into a bustling commercial kitchen. While it looks complex, every ad you create follows a simple three-part recipe: the Campaign, the Ad Set, and the Ad.
Think of it like promoting a weekly special. The Campaign is your main goal (e.g., 'Get more customers for our new brunch'). The Ad Set is who you’ll target and how much you'll spend (e.g., 'people nearby who like brunch, with a $10 daily budget'). Finally, the Ad is the delicious photo and text you show them. This organized structure gives you complete control over your goal, audience, and creative, ensuring your money is spent wisely.
Step 1: Choose Your Goal (Campaign Objective) – Reach or Traffic?
Once you click 'Create' in Ads Manager, your first choice is the Campaign Objective. This is the most important decision for your campaign's success, as it tells Meta exactly what result you want to pay for: more eyeballs or more clicks.
For getting started, you only need to know two objectives: Reach and Traffic. Choosing Reach is like putting a giant banner outside your restaurant—the goal is to be seen by the maximum number of people in your area. In contrast, choosing Traffic is like handing someone a flyer with your website on it and telling them to book a table.
To make the choice easy, follow this guide:
Use Reach when: you want the most people possible in your local area to see your ad. This is great for general awareness, announcing a new opening, or promoting a community event.
Use Traffic when: you want people to click a link to your website. This is perfect for driving online reservations, menu views, or online orders.
With your goal locked in, it's time to set your budget and schedule.
(If you want expert support on setting campaign objectives, explore our paid media services.)
Step 2: Set Your Budget and Schedule Without Fear
This brings us to the big question: how much do restaurant Facebook ads cost? The answer is simple: exactly what you want to spend. To get started without risk, select the Daily Budget option and set it to a comfortable amount like $5 or $10. Think of it as a spending cap—Meta will never charge you more per day, giving you complete control as you learn.
(For a deeper breakdown of smart spending, check our guide on restaurant marketing budget planning.)
You’ll see two choices: Daily or Lifetime Budget. A Daily Budget is your trusty, 'always-on' tool for continuous ads that keep your restaurant top-of-mind. A Lifetime Budget is ideal for a specific promotion with a clear end date, like spending $150 to advertise a New Year's Eve dinner over two weeks. For your first campaign, a daily budget is the safest bet.
For restaurants on a tight budget, Ad Scheduling is a powerful feature. Why waste money showing your dinner special at 9 AM? You can schedule your ad to run only from 4 PM to 8 PM, catching people right as they’re deciding where to eat. With your budget and timing set, you're ready to pinpoint your audience.
Step 3: Target Your Perfect Local Customer (The Ad Set)
Now for the magic. This step, 'Targeting,' is where you stop shouting into the void and start speaking directly to your future customers. For a restaurant, the most powerful tool here is Location Targeting. Instead of showing your ad to the entire city, you can tell Meta to only show it to people within a 3-mile radius of your front door. It’s the digital equivalent of putting a flyer in every mailbox in your neighborhood.
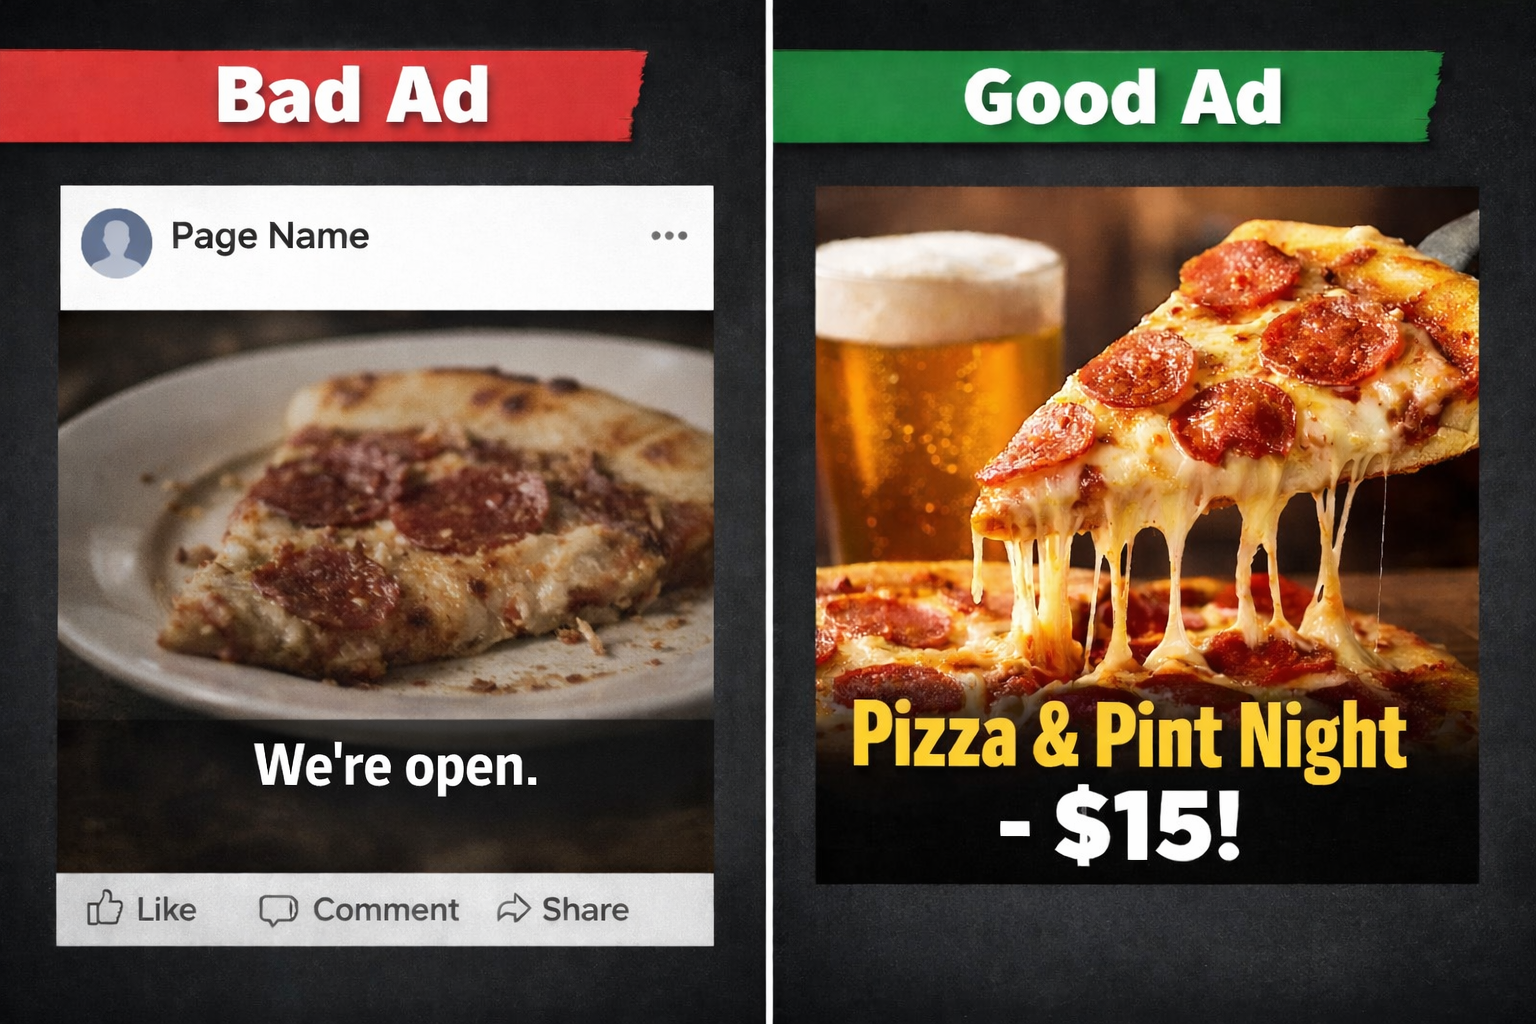
NOTE: It is important to always make sure the food looks as ‘mouthwatering’ as possible when using them as ads. In this example here, you can see how essential lighting and composition are when taking photos.
Getting the location right is a huge step, but you can get even more specific. After defining your radius, you can add layers to find your ideal diner using demographic and interest options. Are you promoting a family-friendly brunch? Adjust the age settings to target parents. These flexible targeting options allow you to refine your audience from 'everyone nearby' to 'the right people nearby.'
(To improve your targeting workflow, explore our roundup of top marketing tools.)
For example, if you're launching a new wine-tasting event, you could target people aged 30+, who live within 5 miles, and who have shown an interest in pages related to 'Wine' or 'Fine Dining.' Suddenly, your $10 daily budget is being shown directly to your most likely customers for that specific offer.
By combining location, age, and interests, you’ve built a custom audience that is far more effective than a simple 'Boost Post' can offer. With your perfect audience waiting, it's time to create an ad that will make their mouths water.
Step 4: Create an Ad That Makes People Hungry (The Ad)
You’ve told Meta who to show your ad to; now it’s time to decide what they’ll see. This is your Ad Creative (image/video) and Ad Copy (text). The single most important rule for restaurant ad creative is simple: people eat with their eyes. Always use a high-quality, mouth-watering photo or short video of your actual food. A blurry shot of your dining room won't work, but a bright, clear shot of your signature burger will stop a user mid-scroll. If your visuals aren’t converting, read our guide on how photography impacts restaurant marketing.
Once your photo grabs their attention, your caption seals the deal. You don’t need to be a professional writer; just be clear and direct. Follow this simple formula for your text:
A hook that grabs attention: 'Skip the cooking tonight!'
The specific offer: 'Our 'Taco Tuesday' deal is on: 3 tacos for $10.'
A clear instruction: 'Tap below to book your table!'
Finally, add a clickable button to your ad. This Call-to-Action (CTA) is crucial for guiding customers. If you want reservations, choose the 'Book Now' button. Promoting a delivery special? Use 'Order Now.' If you want takeout orders, 'Call Now' is perfect. Choosing the right button removes friction and turns a viewer into a customer.
Step 5: Measuring What Matters: Did the Ad Work?
Once your campaign is live, you can finally answer the question, 'Is this thing on?' For measuring restaurant ad success, you only need to check a few key numbers. The first is Reach, which is how many individual people saw your ad. Think of it as the total number of locals who walked past your digital 'sandwich board.'
Seeing the ad is one thing, but getting a response is what matters. That’s where Link Clicks comes in. This tells you how many people were interested enough to tap on your ad to visit your menu, ordering site, or reservation page. Alongside this, Cost per Click (CPC) shows the price you paid for each click. If your CPC is $1.00, you spent a dollar to get one potential customer to your website.
For your first campaign, a 'good' result is simply seeing these numbers in action. The goal isn't to sell out overnight; it's to learn the process, confirm you can reach locals, and see that people are interested enough to click. These are the building blocks of effective marketing strategies that increase restaurant foot traffic. For improving your organic performance alongside ads, check out our Instagram Reels ideas for restaurants.
What's Next? Level Up Your Restaurant's Ad Game
You've moved beyond boosting posts and into the driver's seat of your restaurant's marketing. You now have a process for reaching the right locals with the right message and the skills to launch a campaign that starts filling tables.
Once you're comfortable, the next step is the Meta Pixel—a tool for your website that shows you who makes a reservation. It unlocks 'retargeting,' letting you promote special offers directly to people who have already shown interest in your restaurant online.
You no longer have to guess if your ads are working. You can now see them not as an expense, but as a direct line to future customers. This foundation will allow you to explore even more advanced tools, like lookalike audiences. The kitchen isn't the only place you can create magic.
Want help building an ad campaign that grows your restaurant? Book a free consult with our team and we’ll walk you through the next steps.
Frequently Asked Questions
Q1: What’s the difference between “Boost Post” and a real Meta ad campaign?
Boosting shows your post to a broad group of people for likes or general engagement. A real Meta ad campaign lets you choose a specific goal (Reach or Traffic), target people within a tight radius of your restaurant, control your budget, and use real conversion tools like “Book Now” or “Order Now.”
Q2: How much should a restaurant spend on Meta ads?
Start small with a daily budget of $5 to $10. Meta will never exceed your daily cap. As you see results, you can scale gradually. Restaurants that want consistent growth usually invest between $150 and $500 per month depending on seasonality and goals.
Q3: What targeting works best for restaurants on Meta?
Local targeting is the most important. Set a radius around your address (3 to 5 miles) and layer interests like “Dining Out,” “Wine,” “Brunch,” or “Seafood,” depending on your promotions. This ensures your ads only reach people who can realistically visit.
Q4: What kind of ad creative performs best for restaurants?
High-quality food photos or short videos shot in natural light. Close-up images of real menu items always outperform dining room shots or generic graphics. Use a simple caption with a clear offer and a CTA like “Book Now” or “Order Now.”
Q5: How do I know if my Meta ad is working?
Check Reach (how many locals saw it), Link Clicks (how many interacted), and Cost per Click (CPC). If people are clicking through to your menu, reservation system, or ordering page at a low cost, your campaign is doing its job. You can also attach trackable offers like “Show this ad for 10% off” to measure in-person results.
Q6: What’s the next step after running my first Meta ad?
Install the Meta Pixel on your website. It unlocks retargeting, which allows you to reach people who already visited your menu or booking page. This is one of the most effective ways to turn interested browsers into paying customers.